Guide To Setting Up Mumble On Raspberry Pi


| Contents [hide] |
What is a Raspberry Pi?
From the offical Raspberry Pi FAQ:
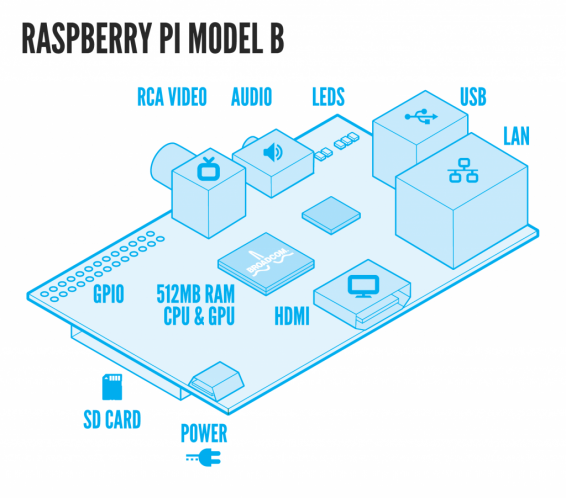
The Raspberry Pi is a credit-card sized computer that plugs into your TV and a keyboard. It’s a capable little PC which can be used for many of the things that your desktop PC does, like spreadsheets, word-processing and games. It also plays high-definition video.
What they don't mention is that the computer itself is only $35, and with minimal investment can become quite a powerful PC.

What is Mumble/Murmur?
From the official Mumble FAQ:
Mumble is a voice chat application for groups. While it can be used for any kind of activity, it is primarily intended for gaming. It can be compared to programs like Ventrilo or TeamSpeak. People tend to simplify things, so when they talk about Mumble they either talk about "Mumble" the client application or about "Mumble & Murmur" the whole voice chat application suite.
Murmur is the server side application that your Mumble client connects to.
How to Get a Raspberry Pi
There are two sellers currently, but in my experience (and I have experience with both), Newark has far better customer service and they are who I would recommend ordering from. The product page is Here.
Other Things You'll Need
Chances are you might already have most of the other items that are necessary for running a Raspberry Pi board. When you order your Pi, you get the board and that's it. If you don't have the following items, you will need to order them as well:
4GB is plenty of space for the Raspberry Pi image. These cards are super cheap so I would stick with a name brand like SanDisk for your card. If you have a SD card already and wonder if it will work, I've included a link in the Useful Links section at the bottom where the helpful folks at eLinux.com have compiled a list of working peripherals.
This is the power cable for your Pi, any cable will work as long as it has the Micro USB form factor.
Most people who own a smart phone (iPhones in particular) will already have one of these. If you have one you can spare, you can use it to run your Pi. Most advice I've seen specifically says NOT to run your Pi from a USB port on another computer. I run mine on a powered USB hub and it works fine, your mileage may vary.
The above 3 items are the main things you'll need. One other thing that you may not have that you will need is a PC with an SD card slot. If your laptop doesn't have such a slot, or your desktop didn't come with an SD card reader, you can pick one of those up for cheap as well. You only need this to transfer the downloaded Raspberry Pi OS image from the .ISO file to the SD card, so if you have friends or family with a computer that has a SD card reader you can avoid this cost.
Optional (but a good idea): A Case
A case is not required for your Pi, but can be a fun investment and potentially life saving, depending on where you end up putting your Pi. The one linked above is cheap and functional, you can always go the other direction if you want as well.
This will allow you to connect your Pi to a regular computer monitor, alternatively you could use your TV for initial setup then use SSH to administer it from then on.
Configuring Your Pi and Network

Basic instructions are here.
Detailed instructions are here.
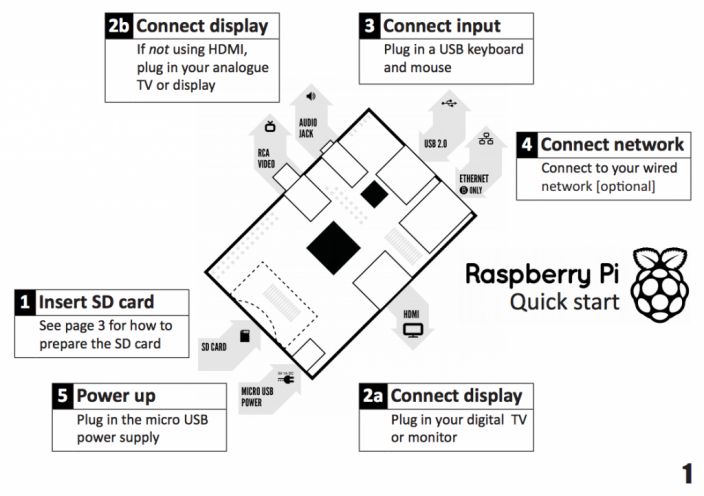
Once you've transferred the disk image to the SD card, pop it into your Pi and plug the Pi in, that's it. After your Pi boots, you will be brought to the raspi-config script menu. This allows you to set up your Pi for it's first use, after the inital set up you can bring the menu up by typing raspi-config from the command line and change whatever you need to from there. I will try to cover most of the "gotchas" that I encountered setting mine up. The help page for this script is here.
- Run the expand_rootfs menu option. It expands the image to "see" your entire SD card so you can use all of the space your card has.
- Run the configure_keyboard menu option. It defaults to a UK setup, which is normally OK but certain keys are laid out differently and if you're American, you'll want to change this.
- Select Generic 105-key (intl) PC, unless your keyboard is one in the list. Hit enter, and arrow down to the "Other" option for layout.
- Select English (US) from the list for your country of origin. Hit enter.
- Select English (US) from the layout list and hit enter.
- Select the default options for the rest of the menus until you get back to the raspi-config page.
- Run the change_pass menu option. DO THIS DO THIS DO THIS. This should not be optional, you are exposing your Raspberry Pi to the web with this guide, and you do NOT want to use the default password for the image.
- Run the change_locale and change_timezone menu options.
- For Locale, use the space bar to deselect the en_GB option and to select the en_us.UTF-8 UTF-8 option. Page down works to reach those options.
- The next screen will ask you for the default locale, I selected en_us.UTF-8.
- The timezone option is obviously the timezone you live in.
- Run the ssh option. This is really handy if you want to administer your Pi from another machine on your network, using a tool like PuTTy (if you're on windows) or the Terminal on OSX/Linux.
- Run the boot_behaviour option. If you're looking for a snappy desktop experience, the Raspberry Pi is not for you. I would leave it to start up in Terminal mode only, the desktop only uses system resources even though it's a version of LXDE, and it really isn't necessary unless you're planning on using your Pi for more than just a Murmur server.
- Lastly run the update option. This will attempt to find any new updates to your software for the Pi. It's handy to run this fairly regularly as things change in the Pi OS world.
Network setup is outside of the scope of this article, but the Raspberry Pi forums are great for support. I highly recommend using a wired connection for this application, you will want all the throughput you can get and wireless is just too flaky for my liking. If you are hell bent on setting up a wireless connection I suggest looking at the official forums for more information.
Once done select Finish and you should be at the pi@raspberrypi command prompt. Now lets set up Mumble/Murmur.
How to Get Mumble/Murmur on Your Pi
Installing Murmur is very simple since we're using the Debian version of the Pi OS. Follow the commands below and you should have it running in no time.
First, update the repositories with the latest packages.
sudo apt-get updateNext, install the application.
sudo apt-get install mumble-serverFinally, run the configuration for the server.
sudo dpkg-reconfigure mumble-serverNote that when you run the configuration, you will be prompted to set the password for the SuperUser account. Make sure you make this something you will remember. Also in the menu for the set up is the option to start murmur when the Pi starts, make sure you select this option as well.
Configuring Mumble\Murmur\Your Network
Network Setup
The first step to using Mumble is opening a tunnel from the web to your Pi. If you are behind a router, you will have to forward a port to your Pi's IP address. Port forwarding is beyond the scope of this article, but I will touch on a few tips here to make it easier.
- To find your Pi's network IP address, bring up the terminal for your Pi and type ifconfig and hit enter. Hopefully you use a wired connection, and you can look at the eth0 group, the inet addr is the IP address on your network.
- Murmur's default port is 64738, this is the port you will have to forward to your Pi, both TCP and UDP.
To connect to your Pi from outside your home network, you will need to set the client up to connect to your IP address (not the Raspberry Pi's IP address, I'm talking about your IP address you are assigned from your ISP). To find your IP address, the easiest way is to open Google and simply type "What is my IP address" and hit enter. Since most people probably don't want to put that out there for everyone to see, and because remembering a random group of numbers isn't user friendly, I suggest signing up for a free account at No-IP. They offer free host/redirects that allow you to get a free URL to use that you can tie to your IP address. They require you confirm once a month that you are still using the address, but other than that annoyance it's a painless way to pass out your server address to others.
Murmur Settings
Murmur works right out of the box but if you want to fiddle, see the Murmurguide for more information.
Mumble Client Settings
When you start the Mumble client, you are met with the server list.
- Click the Add New button to create your regular user account first.
- Add a label for this account.
- Add the server address (use the No-IP url above if you signed up for that, otherwise use your IP address).
- The default port should be the same, unless you changed that above.
- Your user name should be anything other than SuperUser, see below.
Click OK and you should connect to the Mumble chat room.
Now we need to set up the SuperUser account. The SuperUser can change settings with the server through the client, set up chat rooms, manage account/administrative settings, etc. The SuperUser CANNOT talk on the channel. This is to discourage people from joining as SuperUser all the time. To set up your SuperUser connection, follow the same steps as above but for user name enter SuperUser and the password you set when configuring Murmur above. The UI is pretty intuitive for setting up the various options but if you have more questions I would suggest looking on the official Mumble site.
Using Mumble
Using Mumble is easy. There is an audio wizard for getting your sound and microphone configured properly, and you can use either push-to-talk or voice activity detection to make yourself heard.
Final Thoughts
One thing I haven't touched on is bandwidth usage while running Murmur. My own experience is that there isn't a ton of traffic, but it just really depends on how much you are going to use the server. We don't have many people on regularly, and the most I've had at once is over 20 and there were no issues. You will want to check to see if your ISP has bandwidth caps or other restrictions regarding this kind of usage. If there are limitations out there and you still want to try Mumble, there are several hosts out there you can look at (See the Useful Links). What I'm trying to say is use this at your own risk, and make sure you aren't breaking the rules of your ISP by doing so.
You can monitor Murmur's system usage by using the "top" command at the command line. It gives you a real-time view of the status of your Pi. To exit simply hit Ctrl+C.
Useful Links
List of Verified Peripherals for the Raspberry Pi
A List of Mumble Hosting Providers
|
